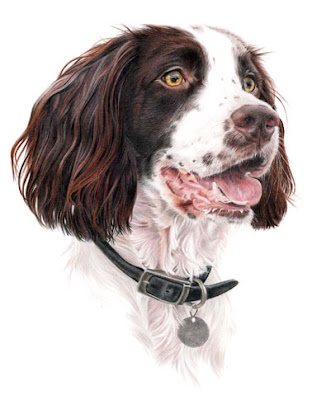
Thistle
12x10 Coloured Pencil on paper
Copyright Laura Hardie 2009
While adding the final touches to Thistle I suddenly remembered about the poll I ran back in March and how I’d totally forgotten to post the results of this on my blog - oops. I do have a terrible memory which only seems to get worse it seems.
Just to refresh your memory (and to update any new readers who haven’t a clue what I’m on about) I was becoming increasingly unhappy with the results I was getting when scanning my drawings, especially those completed using graphite pencil, and wanted to do something about it. I was trying to find the best way to get images of my artwork and was interested to find out what other artists thought and what their preferred method was. See my original post here.
While I’m not sure word for word what my original question was, having noted only the results when the poll closed (a lesson learnt here to write the question down as well), I do know I was asking how you obtained a good image of your art work. Here are the results and I‘d like to say a huge thank you to all those who participated. From the 23 votes recorded…..
- 11 (47%) use a scanner.
- 9 (39%) photograph their drawings/paintings indoors using natural lighting.
- 4 (17%) photograph their drawings/paintings outside.
- 2 (8%) photograph their drawings/paintings indoors using special lighting.
- 2 (8%) have their artwork professionally scanned.
- 1 (4%) has their work professionally photographed.
Overall, photographing artwork whether indoors or outdoors, with or without special lighting turned out to be the most popular method, which did surprise me a little – I assumed that most artists scanned their work. Saying this scanning did come a close second.
I do believe however that whatever method is used that the majority of work happens post scan or photograph in Photoshop. Being able to correct and ‘fine tune' images using this software is great and only wish I knew more about it – or at least lived with someone who does.
I’ve experimented a bit with photographing my drawings and each time return to my scanner as I personally feel I get a better result this way. And now, thanks to a fellow artist, that I know how to get a white background using Photoshop without affecting my drawings I’m going to stick to this method for now.

9 comments:
I especially like the front ear. The fur looks gorgeous! (It's funny the parts that jump out at being my favourite.)
Thistle's people must be very happy with your portrait :)
This is an absolutely beautiful portrait, Laura - outstanding.
I honestly think this is the best dog portrait I've ever seen. Absolutely perfect!
Can you share with us how to get the white background in Photoshop?
Your work is so amazing. Love this one. :) Love all your work.
Wow, thank you so much for the encouraging comments they mean a lot to me:)
Hi Carol, I don't mind sharing at all but I have to thank Grahame Butler (http://grahamebutler.blogspot.com)for kindly helping me out and providing the following step-by-step......
1. If the image is graphite then convert to Greyscale (Image > Mode > Greyscale). This cuts the file size by two thirds and speeds up the following.
2. Hit CTRL+L for Levels, hold down the ALT key and move the right hand slider to the left.. When you begin to remove anything from the drawing itself, stop and back off a little.
3. Hit D to change colours to default Black foreground, White background, then L for Lasso. Draw around all the white you can. Right-click and choose "invert" then hit the delete key.
4. Zoom in to an area of the image so you can see a portion of the image and its dark background halo.
5. Now the magic bit....
6. Hit O for the Dodge tool. Set the tool as follows:
Range: Highlights
Exposure: 5%
7. Now choose a BIG fuzzy brush - but not so big you can't see all of it :o)
8. Use it like an eraser, moving up and down the 'halo' and it will gradually fade. It doesn't matter if you overlap the drawing part, as it shouldn't harm it. Release the mouse often and click again, so you have smaller Undo steps should you need to backtrack.
It takes practice but it's very effective!
9. When you've removed the halo, zoom out until you can see all of the image. Now you can use CTRL+L (Levels) again or (my preference) wipe over the whole area with the Dodge tool to brighten it as required.
10. Finally resize to suit the requirement then sharpen using Unsharp Mask. I keep the Unsharp Mask permanently set to 5%, which sharpens just a little. Then just use CTRL+F repeatedly to sharpen again and again until it looks good.
Hope this helps:)
Love the spaniel Laura, I have trouble with images too, I've found that taking shots outside sometimes drains the colour from a portrait too. Usually my art is too big to fit in a scanner (perhaps I ought to buy a bigger one instead of a new camera)
really lovely,skilled work and the tips for photoshop will be very useful.
Hi,
A word comes to mind : "quality" .
Best,
José
Post a Comment